CI/CD Pipelines
CI/CD automates the journey from code commit to production. Continuous Integration merges and tests code automatically. Continuous Delivery makes every build deployable. Continuous Deployment pushes to production without human intervention.
Explain Like I'm 12
Imagine a factory assembly line for building toy cars. When you finish designing a new part (writing code), you put it on the conveyor belt. The first station checks if your part fits with all the other parts (integration tests). The next station paints and polishes it (build). Then a quality inspector tests that the car actually drives (end-to-end tests). Finally, the car rolls off the line and goes straight to the toy store shelf (deployment). CI/CD is that entire assembly line — automated, fast, and it catches broken parts before customers ever see them.
CI vs CD vs CD
These three acronyms get jumbled together constantly. Let’s untangle them once and for all:
Continuous Integration (CI) — Every developer pushes code to a shared repository multiple times a day. Each push triggers an automated build and test suite. The goal: catch integration bugs within minutes, not days. If the tests break, the team fixes them immediately. No more “it works on my machine.”
Continuous Delivery (CD) — Takes CI further. After code passes all tests, it’s automatically packaged and staged so it could be deployed to production at any moment. A human still clicks the “deploy” button, but the artifact is always ready. Think of it as “always releasable.”
Continuous Deployment (CD) — The final frontier. Every change that passes the full pipeline goes to production automatically — no human approval gate. This requires excellent test coverage and monitoring. Companies like Netflix and GitHub deploy hundreds of times per day this way.
| Aspect | Continuous Integration | Continuous Delivery | Continuous Deployment |
|---|---|---|---|
| Trigger | Every commit | Every commit | Every commit |
| Build & Test | Automated | Automated | Automated |
| Deploy to staging | No | Automated | Automated |
| Deploy to production | No | Manual approval | Automated |
| Risk level | Low | Medium | Requires robust testing |
Pipeline Stages
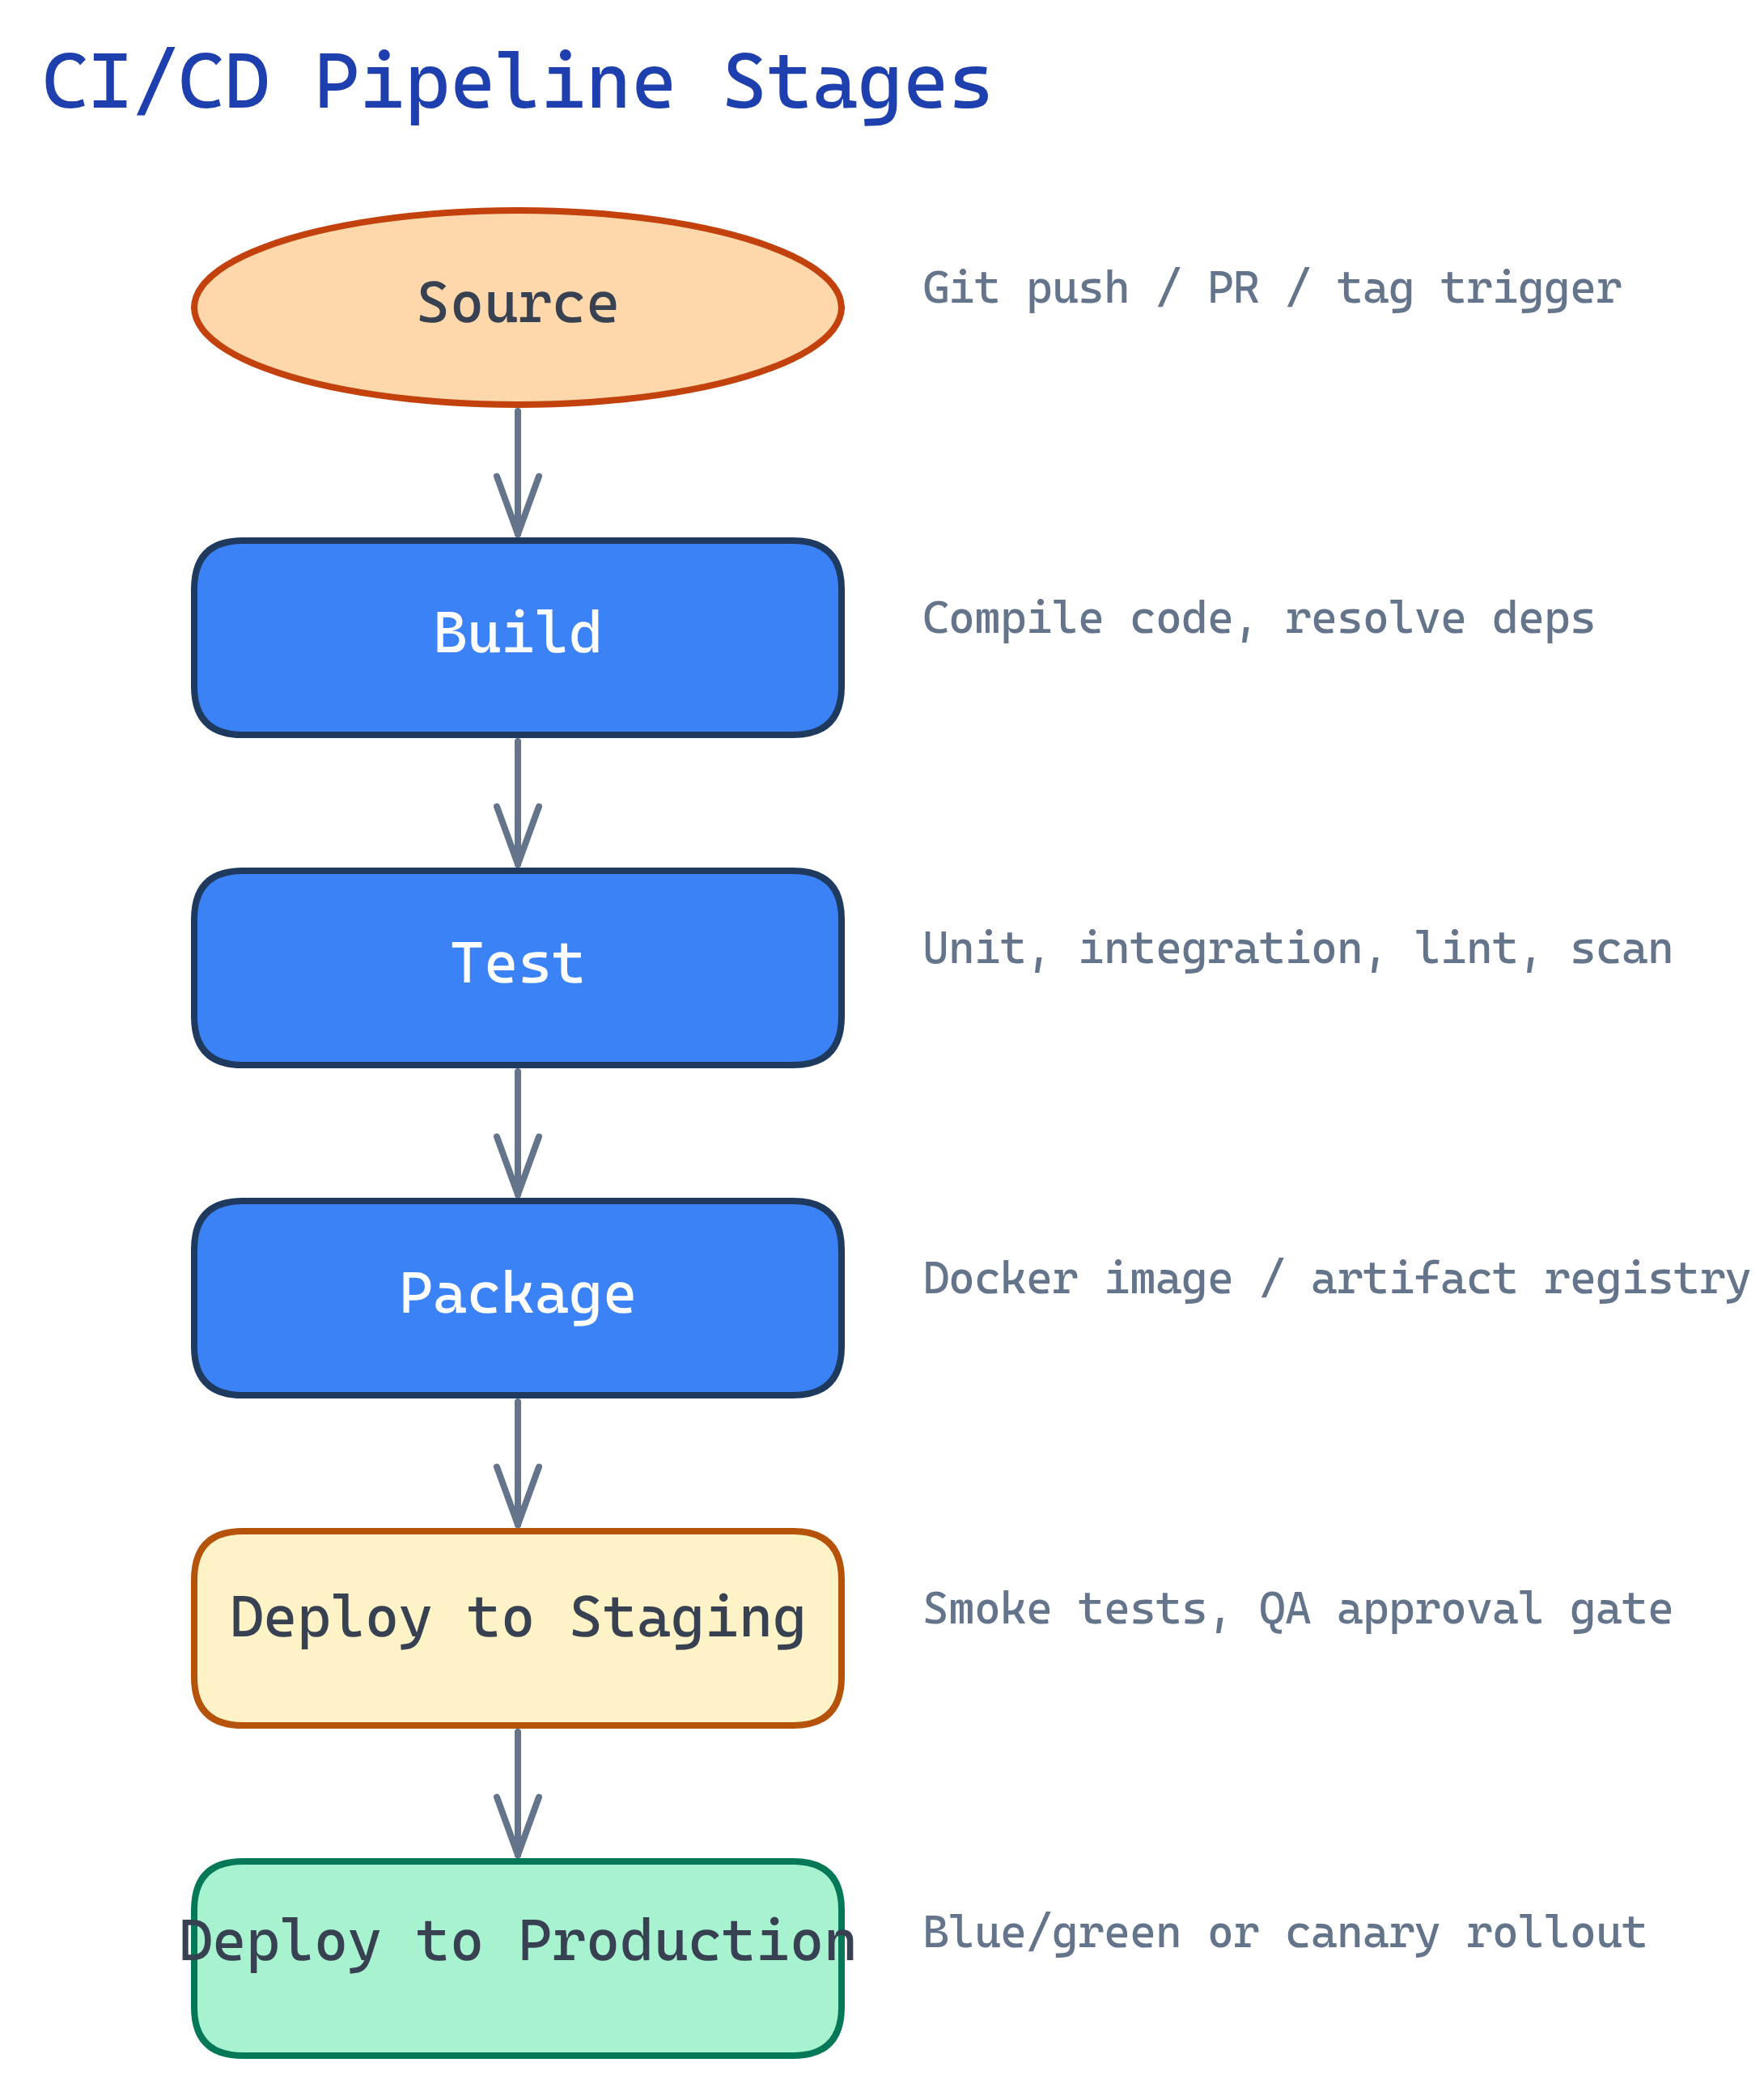
A CI/CD pipeline is a series of automated steps that take your code from a developer’s machine to production. Here’s what each stage does:
Source — The pipeline starts when something changes. A developer pushes a commit, opens a pull request, or a scheduled cron fires. The CI server clones the repository and checks out the relevant branch.
Build — The code is compiled (if needed), dependencies are installed, and assets are bundled. For a Node.js app, this means npm install and npm run build. For Go, it’s go build. The output is a build artifact.
Test — The most critical stage. Run unit tests first (they’re fast and cheap). Then integration tests to verify components work together. Then end-to-end tests to simulate real user behavior. Also run linters and security scanners here.
Package — Wrap the tested artifact into a deployable format. Usually a Docker image tagged with the commit SHA or semantic version. Push it to a container registry (Docker Hub, GitHub Container Registry, ECR, GCR).
Deploy — Roll out the packaged artifact. Typically to a staging environment first for final validation, then to production. This is where deployment strategies (blue-green, canary, rolling) come into play.
GitHub Actions
GitHub Actions is the built-in CI/CD system for GitHub repositories. Workflows are defined in YAML files inside .github/workflows/. If your code lives on GitHub, Actions is the path of least resistance — no separate CI server to manage.
How It Works
You define a workflow (the YAML file) that contains one or more jobs. Each job runs on a runner (a VM provided by GitHub or self-hosted). Jobs contain steps — either shell commands or reusable actions from the marketplace.
Example: Node.js Build, Test, and Deploy
# .github/workflows/ci-cd.yml
name: CI/CD Pipeline

on:
  push:
    branches: [main]
  pull_request:
    branches: [main]

jobs:
  build-and-test:
    runs-on: ubuntu-latest
    steps:
      - name: Checkout code
        uses: actions/checkout@v4

      - name: Setup Node.js
        uses: actions/setup-node@v4
        with:
          node-version: '20'
          cache: 'npm'

      - name: Install dependencies
        run: npm ci

      - name: Run linter
        run: npm run lint

      - name: Run unit tests
        run: npm test

      - name: Build application
        run: npm run build

      - name: Upload build artifact
        uses: actions/upload-artifact@v4
        with:
          name: build-output
          path: dist/

  deploy:
    needs: build-and-test
    if: github.ref == 'refs/heads/main'
    runs-on: ubuntu-latest
    environment: production
    steps:
      - name: Download build artifact
        uses: actions/download-artifact@v4
        with:
          name: build-output
          path: dist/

      - name: Deploy to production
        run: |
          echo "Deploying to production..."
          # Replace with your actual deploy command
          # e.g., aws s3 sync dist/ s3://my-bucket/
          # or: kubectl apply -f k8s/deployment.yaml
Let’s break down the key pieces:
on:— Triggers. This fires on pushes tomainand on PRs targetingmain.runs-on:— The runner OS.ubuntu-latestis the most common (free for public repos).cache: 'npm'— Cachesnode_modulesbetween runs for faster installs.npm ci— Clean install from lockfile (faster and more reproducible thannpm install).needs: build-and-test— The deploy job waits for build-and-test to succeed.environment: production— Enables environment protection rules (approvals, secrets scoping).
workflow_call trigger) in a shared repo. Then each repo calls it with uses: org/shared-workflows/.github/workflows/ci.yml@main. One place to update, 10 repos benefit.
Jenkins
Jenkins is the granddaddy of CI/CD — open-source, self-hosted, and infinitely customizable. It runs on your own servers (or a VM/container you manage). Pipelines are defined in a Jenkinsfile using Groovy-based DSL.
When to Choose Jenkins
Jenkins shines when you need full control: air-gapped environments, custom hardware for builds, or complex enterprise workflows with dozens of plugins. The trade-off is maintenance — you manage the Jenkins server, agents, plugins, and security yourself.
Example: Declarative Jenkinsfile
// Jenkinsfile (Declarative Pipeline)
pipeline {
    agent any

    environment {
        DOCKER_REGISTRY = 'registry.example.com'
        APP_NAME        = 'my-app'
    }

    stages {
        stage('Checkout') {
            steps {
                checkout scm
            }
        }

        stage('Build') {
            steps {
                sh 'npm ci'
                sh 'npm run build'
            }
        }

        stage('Test') {
            parallel {
                stage('Unit Tests') {
                    steps {
                        sh 'npm run test:unit'
                    }
                }
                stage('Integration Tests') {
                    steps {
                        sh 'npm run test:integration'
                    }
                }
            }
        }

        stage('Package') {
            steps {
                sh """
                    docker build -t ${DOCKER_REGISTRY}/${APP_NAME}:${BUILD_NUMBER} .
                    docker push ${DOCKER_REGISTRY}/${APP_NAME}:${BUILD_NUMBER}
                """
            }
        }

        stage('Deploy to Staging') {
            steps {
                sh "kubectl set image deployment/${APP_NAME} ${APP_NAME}=${DOCKER_REGISTRY}/${APP_NAME}:${BUILD_NUMBER} -n staging"
            }
        }

        stage('Deploy to Production') {
            input {
                message 'Deploy to production?'
                ok 'Yes, deploy it!'
            }
            steps {
                sh "kubectl set image deployment/${APP_NAME} ${APP_NAME}=${DOCKER_REGISTRY}/${APP_NAME}:${BUILD_NUMBER} -n production"
            }
        }
    }

    post {
        failure {
            slackSend channel: '#deployments',
                      message: "FAILED: ${env.JOB_NAME} #${env.BUILD_NUMBER}"
        }
        success {
            slackSend channel: '#deployments',
                      message: "SUCCESS: ${env.JOB_NAME} #${env.BUILD_NUMBER}"
        }
    }
}
Key Jenkins concepts in this example:
agent any— Run on any available Jenkins agent (worker node).parallel— Run unit and integration tests simultaneously to save time.input— Pauses the pipeline and waits for a human to approve the production deploy (Continuous Delivery, not Deployment).post— Runs after all stages, regardless of result. Great for notifications.
GitLab CI
GitLab CI is built directly into GitLab — no separate tool to install. You define your pipeline in a .gitlab-ci.yml file at the root of your repo. GitLab’s killer feature is that CI/CD, container registry, package registry, environments, and monitoring are all in one platform.
Example: .gitlab-ci.yml
# .gitlab-ci.yml
stages:
  - build
  - test
  - package
  - deploy

variables:
  DOCKER_IMAGE: $CI_REGISTRY_IMAGE:$CI_COMMIT_SHORT_SHA
  NODE_VERSION: "20"

cache:
  key: ${CI_COMMIT_REF_SLUG}
  paths:
    - node_modules/

build:
  stage: build
  image: node:${NODE_VERSION}
  script:
    - npm ci
    - npm run build
  artifacts:
    paths:
      - dist/
    expire_in: 1 hour

unit-tests:
  stage: test
  image: node:${NODE_VERSION}
  script:
    - npm ci
    - npm run test:unit
  coverage: '/Lines\s*:\s*(\d+\.?\d*)%/'

integration-tests:
  stage: test
  image: node:${NODE_VERSION}
  services:
    - postgres:15
  variables:
    POSTGRES_DB: testdb
    POSTGRES_USER: runner
    POSTGRES_PASSWORD: secret
  script:
    - npm ci
    - npm run test:integration

package:
  stage: package
  image: docker:24
  services:
    - docker:24-dind
  script:
    - docker login -u $CI_REGISTRY_USER -p $CI_REGISTRY_PASSWORD $CI_REGISTRY
    - docker build -t $DOCKER_IMAGE .
    - docker push $DOCKER_IMAGE

deploy-production:
  stage: deploy
  image: bitnami/kubectl:latest
  environment:
    name: production
    url: https://myapp.example.com
  script:
    - kubectl set image deployment/myapp myapp=$DOCKER_IMAGE
  when: manual
  only:
    - main
What stands out in GitLab CI:
services:— Spin up sidecar containers (like Postgres) for integration tests. No external test database needed.artifacts:— Pass build output between stages automatically.coverage:— Extract test coverage from console output with a regex. GitLab displays it in merge requests.when: manual— The production deploy requires a click (Continuous Delivery). Remove this line for Continuous Deployment.$CI_REGISTRY_IMAGE— GitLab’s built-in container registry, no Docker Hub account needed.
registry.gitlab.com/your-group/your-project. Your pipeline can build, push, and pull Docker images without configuring any external registry. This simplifies the package stage significantly.
Comparison Table
Choosing a CI/CD tool depends on where your code lives, your budget, and how much infrastructure you want to manage:
| Feature | GitHub Actions | Jenkins | GitLab CI |
|---|---|---|---|
| Hosting | Cloud (GitHub-hosted runners) or self-hosted | Self-hosted only | Cloud (GitLab.com) or self-hosted |
| Config format | YAML (.github/workflows/) | Groovy (Jenkinsfile) | YAML (.gitlab-ci.yml) |
| Pricing | Free for public repos; 2,000 min/mo free for private | Free (open source); you pay for infra | Free tier: 400 min/mo; paid plans scale up |
| Ecosystem | 17,000+ marketplace actions | 1,800+ plugins | Built-in features (registry, SAST, DAST) |
| Strengths | Tight GitHub integration, easy setup, great DX | Maximum flexibility, any language/platform | All-in-one platform (SCM + CI + registry + monitoring) |
| Weaknesses | Vendor lock-in to GitHub, runner minute limits | Complex setup, plugin conflicts, maintenance burden | Slower UI, YAML can get complex for large pipelines |
| Best for | Teams already on GitHub, open-source projects | Enterprise with complex requirements, air-gapped envs | Teams wanting one platform for everything |
Deployment Strategies
Getting code to production is one thing. Getting it there safely is another. Here are the four strategies you’ll encounter most:
Blue-Green Deployment
Run two identical production environments: Blue (current live) and Green (new version). Deploy the new version to Green. Test it. Then switch the load balancer to point traffic from Blue to Green. If anything goes wrong, switch back instantly.
- When to use: You need zero-downtime deployments and instant rollback.
- Trade-off: You pay for double the infrastructure during the switch.
Canary Deployment
Roll out the new version to a small percentage of users (say 5%). Monitor error rates and performance. If everything looks good, gradually increase to 25%, 50%, then 100%. If something breaks, only 5% of users were affected.
- When to use: High-traffic apps where you want real-world validation before full rollout.
- Trade-off: More complex routing and monitoring setup required.
Rolling Deployment
Replace instances of the old version one at a time. If you have 10 servers, update server 1, wait for it to be healthy, then update server 2, and so on. At any point, a mix of old and new versions is running.
- When to use: Standard approach for Kubernetes deployments. Good balance of safety and resource efficiency.
- Trade-off: During the rollout, users might hit either the old or new version (must be backward-compatible).
Feature Flags
Deploy the new code to production but keep it hidden behind a flag. The code is live but inactive. Flip the flag to enable it for specific users, teams, or percentages. This decouples deployment from release.
- When to use: Long-running features, A/B testing, gradual rollouts without separate infrastructure.
- Trade-off: Flag management becomes its own complexity. Clean up old flags regularly or they accumulate.
Best Practices
- Keep pipelines fast (under 10 minutes). Developers won’t wait 30 minutes for feedback. If your pipeline is slow, parallelize tests, cache dependencies, and trim unnecessary steps.
- Fail fast. Run linting and unit tests before integration and e2e tests. If a semicolon is missing, find out in 30 seconds, not 10 minutes.
- Cache dependencies. Downloading 500 MB of
node_moduleson every run is waste. All major CI tools support caching — use it. - Use environment variables for secrets. Never hardcode API keys, passwords, or tokens in your pipeline YAML. Use your CI tool’s secrets management (GitHub Secrets, Jenkins Credentials, GitLab CI Variables).
- Pin dependency versions. Use lockfiles (
package-lock.json,Pipfile.lock) and pin Docker base image versions.node:latesttoday is notnode:latesttomorrow. - Run pipelines on every PR. Don’t merge code that hasn’t been through the pipeline. Enable branch protection rules to enforce this.
- Monitor pipeline metrics. Track build times, failure rates, and flaky tests. A test that fails randomly 10% of the time erodes trust in the entire pipeline.
- Keep pipeline config in the repo.
Jenkinsfile,.github/workflows/, or.gitlab-ci.ymlshould be versioned alongside the code. Pipeline changes go through the same PR review process.
Test Yourself
Q: What is the difference between Continuous Delivery and Continuous Deployment?
Q: Name the five core stages of a typical CI/CD pipeline in order.
Q: Why should you order pipeline stages from cheapest to most expensive?
Q: What does the needs keyword in a GitHub Actions workflow do?
needs keyword creates a dependency between jobs. A job with needs: build-and-test will only run after the build-and-test job succeeds. Without needs, jobs run in parallel by default.Q: When would you choose a canary deployment over a blue-green deployment?
Interview Questions
Q: Your CI pipeline takes 45 minutes. How do you bring it under 10 minutes?
Q: How do you handle database migrations in a CI/CD pipeline?
Q: A critical security vulnerability is discovered in production. Walk me through the emergency fix process with CI/CD.
Q: Compare self-hosted runners vs cloud-hosted runners. When would you choose each?
Q: How do you keep secrets secure in a CI/CD pipeline?